Wood Stairs » Installation » Stair Angles and Miters
Balustrade installation requires knowing the degree of the stair and how to use this angle to determine the other stair angles and miters you will need to cut balusters, handrails, and moldings. There is basically one number that is a constant that is very simply used to determine all of the other angles on a staircase. Knowing the degree of the stair will make all of the cuts and miters easy to determine and eliminate a lot of headaches. The Stair Wizard can help you configure your stairs in half the time; creating an exact template for each tread (or riser), including end angles, length, and depth.
The degree of the stair angle can be found by using a digital level or one of several different types of angle finders. Also, there are a number of stair angle calculators you can search and find online. If all else fails you can use trigonometry for finding the angle of a right triangle. This is a little more complex if you don’t know how to do and in such cases we recommend one of the previous options.
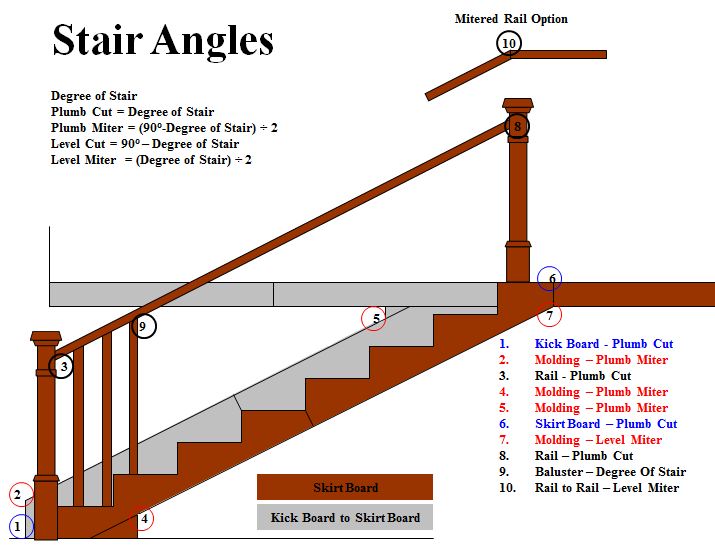
Once you have the degree of the stair all of the other stair angles and miters are very simple. Since most of these angles are used multiple times throughout the installation process, we recommend that you make a cheat sheet at the beginning that you can refer to periodically as you need it. Let’s assume a fairly typical Degree of Stair of 37.5° for the following examples. Basically, there are five cut angles you will need to know; Degree of Stair Level Cut, Level Miter, Plumb Cut and Plumb Miter.
In addition to helping you solve for the other cut angles, the Degree of Stair is itself used as a cut angle. For example, the tops of square top wood or Craftsman balusters are simply the Degree of Stair and the bottoms of wood balusters on a curbwall.
Example: Of course this angle would be 37.5°
The Level Cut is used to cut a component that is angled with the stairs level at the top or bottom. For example, the point at which the skirt board sits level on the floor at the bottom of the stair.
The formula for a Level Cut = 90 – Degree of Stair
Example: 90 – 37.5 = 52.5
The Level Miter angle is used to miter molding, for example, where it transitions from the stair angle to level.
The Formula for a Level Miter= Degree of Stair ÷ 2
Example: 37.5 ÷ 2 = 18.75
The Plumb Cut is used in a variety of situations, for example where the handrail runs into a post at the top of the stairs or the fillet pieces between square top wood balusters.
The Plumb Cut is simple. The Plumb Cut = Degree of Stair
Example: 37.5
Finally you have the Plumb Miter which is used to miter molding, for example, where it transitions from the stair angle to plumb.
The Plumb Miter = 90 – Degree of Stair) ÷ 2
Example: (90 – 37.5) ÷ 2 = 26.25
Knowing these simple stair angles from the start will dramatically increase your speed and efficiency during installation. So take a little time to get prepared then remember to double check your angles with a test piece and finally measure twice, cut once! 🙂
